Install Wamp Server On Your Machine:
For the website development we require a web server that will enable us to run our site on localhost; it means that instead of testing on hosting web server we can test our web pages on localhost with the help of web servers. Wamp Server is web development environment for Windows. It allows us to use Apache, MySql Database and PHP language. Some of the other web servers:
1.WAMP Server : For The Windows Operating Systems [Supports PHP, Apache, MySql Database]
2. XAMPP Server: For The Linux Operating System
3. MAMP Server: For Mac OS.
You can install any of them according to your OS. If you don’t have Wampserver.exe then just go to following link and download:
Download Wamp Server:
http://www.wampserver.com/en/#download-wrapper
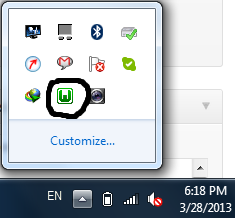
You can select default installation for wamp server. After succesfull installation of wamp server. Open WampServer. At the right-bottom of the Taskbar you will see folowing screen:
Notice the highlighted area. If its green it means that it started correcly. If its in RED color means that we need to start it. Click on it and select “Put Online” or “Start All Services”. If its giving error in windows 7 then it means we need to run wampserver as an administrator while opening. You can check that everything configured correctly or not by opening any browser and typing [http://localhost] and press enter. It will show wamp server screen. If not make sure that IIS Server or Skype is not installed on your system. Because IIS nd Skype use same port no. i.e. 80 and Wamp Server also uses port no. 80. So either you can uninstall/stop server of the skype, IIS or change the port no. of wampserver. To change port no. of wampserver goto :
Change Port No. in Wamp Server:
C:\wamp\bin\apache\apache2.2.22\conf\ and open “httpd.conf” file in notepad. Press Ctrl+F and search 80. After clicking on Find Next you will see “Listen 80” change it to “Listen 8080″ or “Listen 8081” as your wish. Save the file. Restart the Wamp Server or Restart All Services by wamp server icon on taskbar. After that type http://localhost:8080 or http://localhost:8081.
If you see this screen then it means that you have installed Wampserver correctly and you are ready to web development with wampserver (PHP, MySql, Apache). Place your .php files or create your project folder in C:\wamp\www\ and then oepn localhost in browser and your project folder is listed at right side. click on that folder it open your index.php or index.html file from your project folder. If you don’t have then create and start with your project.
Happy Coding…!!! And All The Best…!!! 🙂

